Astounding Compounding

Did you know that most children’s medicine has food dye in them?  And corn?  And all kinds of other preservatives and such that are really gross to think about?

Did you know that you don’t HAVE to give that junk to your kids?

I didn’t either.

But thanks to the wonderful women on BabyCenter’s FPIES boards, I learned about a little thing called “compounding”.

Basically, the pharmacist takes your list of requirements, and figures out a way to provide the medicine you need without any of your personal poisons.

Astounding!

Well, I have two kiddos that have allergies, most still unknown, and I need to have some drugs available for necessities.  (You know, Benadryl for mild allergic reactions, Motrin for teething pain, Tylenol for fevers, etc.)  So, I looked into compounding.

I probably should have gone to Walgreens; that way, in case I was ever out of town I could theoretically get the medicines we need right away.  That whole nationwide database thing, you know.  But, I took our pediatricians recommendation and went to Collier Drug instead.

Am I ever glad I did!

I’m not much for naming names here; I try to keep fairly anonymous for privacy reasons, and I don’t want to say anything untoward about someone accidentally, but I am naming me some names, now, folks!

Andrew and Rodney ROCK.  Period.

They walked me through the process, worked hard to figure out how to do what we needed, and even ordered special supplies to make the Vitamin D Mr. Happy needs.

I now have as pure as can be found antihistamines for both boys, Vitamin D for Mr. Happy, acetaminophen for Mr. Happy, and Motrin for Mr. Charm.

No food dyes.  No corn.  No preservatives.  No JUNK.

Yes, it costs a bit more than just buying the pretty boxes on the shelves, but it’s worth it, in my book.  Now I don’t have to worry that the medicine I give my kids for a mild allergic reaction may actually CAUSE an allergic reaction!  Now I know I’m only giving my kiddos exactly what they need, without the superfluous ingredients that really should concern mama’s everywhere.

The next step is to compound some daily vitamins for Mr. Charm, and maybe for myself.  (Yes, I’m losing weight on the elimination diet, but I need to keep my strength up and it’s hard to find vitamins that don’t have dairy or soy in them.)

So if you have some allergic kiddos, or if YOU are allergic, or if you just don’t like the idea of pumping food dyes and such into yourself or your family, look into compounding.

If you don’t have a drugstore near you that will do it, Rodney told me that they will happily make and mail any medicines you need to wherever you are.  Just contact Collier Drugs and they’ll take excellent care of you!

I was not paid or even encouraged to write this post.  I did it just because they are awesome and I wanted to share.  But Rodney and Andrew?  I wouldn’t say no to a discount on my next order!
Perspective

This post has nothing to do with my kids, or FPIES, or anything I usually write about.

This post is about perspective.

When I was 14 years old, I joined the swim team at my school.  I sucked at every single stroke except  for backstroke, but I was so awesome at backstroke I wound up on the Varsity team my very first year.

I also played deep-end goalie on the water polo team.  (Now that’s a vicious sport!)

Spending two-plus hours a day swimming your brains out in the pool has a drastic effect on your physique: I was the skinniest I had ever been in my life.

However, even though my ribs and hip bones jutted out almost sickly on my body, I thought I was tremendously fat.

Unlike most other girls of that age group, I was a, ahem, well-developed young lady.  I had a perfect hourglass figure.  No joke – my  measurements fit the definition of perfect hourglass.  I’ll even share the numbers: 36-25-36.  Compared to the girls with, um, straighter bodies than me, I thought I was fat.

My mind boggles at the thought of that now…can you imagine?  For a brief period of my life, I had a dang near PERFECT body.  And I thought I was FAT.

If I had a time machine, I’d go back twenty years and slap myself across the face.  Ugh.

Once my P.E. requirements for graduation were finished, I quit the swim team.  Athletics has never been my thing, you see.

So my last two years of high school saw some weight gain.  Now, I was nowhere near obese – I was just bigger than those first two years.  Plus, I was growing and getting older, so that helped to compound the issue.

I wore a lovely size 10, with an occasional 8 or 12 thrown in depending on manufacturer.  It looked good on me, now that I look back, but at the time, I thought I was OBESE.

See, if I was FAT when on the swim team, then that meant I had to be OBESE when I wasn’t as skinny anymore.  Logic, right?

Again, I’d really love to be able to go back in time 18 years and slap myself.

Because today, my dears, TODAY, I have lost a whopping 32 pounds off the weight I’ve been stagnant at for the last 12 years or so.  A weight that WAS, in fact, borderline obese.

I am now wearing clothing I wore in my junior year of high school, and it fits well.

For the first time in almost two decades, I see myself in the mirror and LIKE what I see.

At the risk of sounding vain, I’ll go a step further: I see myself in the mirror, and I preen and think to myself “You’re looking HAWT today, girl!”

And believe me, I’m anything BUT hot!  I *have* had two children, you know!  That perfect hourglass is long gone, things have shifted that probably won’t ever shift back, and you mama’s out there know what the tummy looks like the year after you give birth!

But right now, to me, based on how I looked throughout my twenties and early thirties, I feel like the hottest, sexiest babe on the planet.

Well, if the hottest, sexiest babe on the planet wears her hair in a bun so she doesn’t have to wash it so often and frequently deals with spit-up and poo!

It’s alllll about perspective.

While I am very pleased with what is happening to my body, I’m not writing this just to toot my own horn.  One of the thoughts that has been rolling around in my head lately has to do with how women look at themselves; their perspective, if you will, of how they look and feel.

As I stated, I spent the best-looking 4 years of my life feeling fat or obese, when the truth is, I was anything BUT those things.

I know (because I’m a girl, and girls talk) that I’m not alone in that.

So I really want to encourage every woman that reads this to go take a good look in the mirror.  Odds are, you look a WHOLE lot better than you think you do.  Odds are, your perspective is just skewed.  

Now, if you really, truly do need to lose some weight for health reasons, please do so.  But I promise you, even if you’re packing a few extra pounds?

You’re beautiful.

HAWT, even.

You just need to believe it.

(Because we don’t have time machines to go back and slap our 15 year old selves.)

Anyone else out there had a perspective shift about their bodies?

Snack Attack – Beef Jerky!

I have always loved beef jerky.  Yu-uumm!  It’s not terribly lady-like, but I just love ripping off a piece of meat with my teeth.  Makes me feel powerful in some primal way, I suppose.

But have you looked at the ingredients on the bag of beef jerky at the store?

Ugh.

Seriously, who needs all that junk in dried beef?  This is, again, what should be a simple, real food item that manufacturers have filled with poisons.

So, I decided to make my own.

There are a ton of great books and recipes out there on how to make beef jerky; alas, most use seasonings we cannot have at the moment.

So I decided to wing it.  How bad could it be, right?

It was delicious.  This is some seriously addictive beef jerky, y’all.

Here’s how I did it:

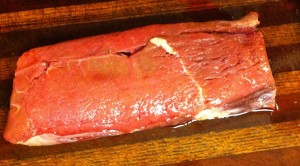
Round steak ready to slice

I grabbed a couple packages of round steak out of my freezer.  It was the most suitable cut of beef that I had on hand, but feel free to try whatever cut you think would work best for you.  The round steak does great as far as I’m concerned.

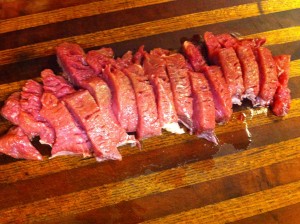
I thawed it out to where it was still a little frozen but soft enough to cut.  Then I sliced it against the grain into fairly thin strips.  A half inch to 3/4 an inch wide, I’d say.

Sliced and ready to marinade

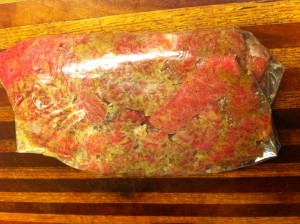
I threw it in a gallon ziploc bag, and into that I tossed in my garlic powder, onion powder, salt, pepper, and olive oil.

Kinda looks gross in the bag, but it will taste SO GOOD I overlook that.

Then I got to squish it all around until I’d covered all those little pieces of meat with seasoning.

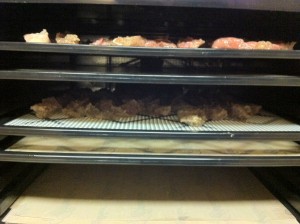
I stuck it in the fridge to let it marinate for about 24 hours, then I tossed the beef on my dehydrator trays.  (The second time I made it, I let it marinade for 48 hours, and Oh My – the longer marinade is worth the time!  It made it even better.)

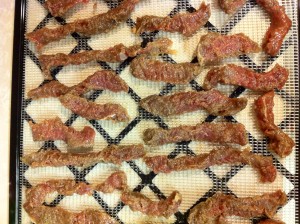
Laid out on the dehydrator trays

Cranked the temperature up to 155, turned the knob and let the dehydrator have at it!

I place each tray of jerky above another tray lined with a silpat. That way any drips from the olive oil catch on the silpat and don’t fall on the jerky below. It’s pretty easy to clean up that way, too.

I’m in the habit of turning on my dehydrator right before bed, so I don’t have to listen to it humming all day long.  It’s not terribly loud, but I always think my dishwasher or dryer is on overload when I constantly hear humming, and that bugs me.  So I do an overnight dry most of the time, just to avoid that.

In the morning, I checked my jerky.  It was mostly done, but I flipped over all the little pieces to let the bottoms get really done as well.  Initial drying time plus the three hours after flipping, I’d say it was about 12 hours total in the dehydrator.

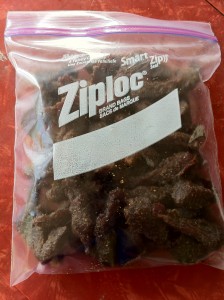
The finished product – a whole bag of YUM!

Was it ever worth it!  I think we ate the whole bag in less than a day!  I really don’t think there’s a possible way for me to make TOO MUCH beef jerky in this house.

One caveat, for those who watch their weight: just for amusement, I weighed the beef before it went in to dry, and weighed it afterwards.  The dehydration cuts the weight almost exactly in half!  So this winds up being a very calorie dense food.

Right now, I get so little in the way of “make me drool, I crave this, delicious yummy treats” that I’m willing to eat fruit the rest of the day so I can gorge on beef jerky, though.  I’ll have to watch it and portion it into single serving sizes, though, when I’m back to eating normally.

Because even after the elimination diet is over?  THIS is a new “Standard Family Recipe” in my world.

Give it a shot – I promise, if you do, you’ll never eat that store bought…stuff…again!

__________

BEEF JERKY

– 1.5 pounds round steak (or whatever cut of beef you like best)
– 1/2 cup olive oil
– 1/8-1/4 cup garlic powder
– 1/8 cup onion powder
– 1/8 cup sea salt (reduce if you prefer)
– 1/8 cup black pepper

  1. Cut steak against the grain into narrow strips.
  2. Toss the steak strips, oil, and spices in a gallon ziploc bag.
  3. Let marinade in the fridge for 24-48 hours.  The longer, the better!
  4. Lay out your strips on dehydrating trays.
  5. Set temperature to 155, and let run for 8-12 hours.  If you can, flip the jerky over when it’s mostly done to ensure the bottoms get nice and dry, too.  It’s done when it’s pliable but not moist.
  6. Try not to eat it all in one sitting!

__________

Do you have any fabulous spice mixes that you recommend for beef jerky?

This post has been shared with Allergy-Free Wednesdays, Real Food Wednesdays, Whole Foods Wednesdays,  and Frugal Ways, Sustainable Days.

How Mr. Happy and the Boobies Are Getting Along

It’s been two weeks and two days of nursing…how is it going?

Really well, I think.

I *think*.

The last 4 days Mr. Happy has been showing some slight eczema on his cheeks.  (Which could just be some heat irritation or something he rubbed his cheeks on that is bothering him.)

He’s had a few diapers that had a little bit of mucous in them.  (But the weather has been weird and the whole family is sort of mucousy right now.)

The last 5 nights he’s woken up much more frequently to nurse.  (Instead of his 8:00 p.m. bedtime feed, followed by midnight, then 4:30 a.m., then 6:30 a.m. and up for the day, it’s been more like every 2.5-3.5 hours all night long.  Not a big change, but noticeable, though it could just be a growth spurt.)

He’s had a tad bit of spit up, but it hasn’t concerned me very much at all; most babies spit up a little bit, and this is just a little bit.  (The first time I was nursing him after he was born, he spit up CRAZY amounts.  Like, saturate one or more burp cloths daily and change his clothes a few times every day.  Now?  I don’t even remember where the burp cloths are.)

But other than those four slightly concerning symptoms, he’s a fantastically happy baby!

So, I think he’s doing well on the elimination diet.

The ‘back of my mind’ concern hinges on the eczema and loose stools.  That’s exactly what Mr. Charm was like after I eliminated dairy, soy and egg from my diet.  SO much improved that I accepted the supposed ‘fix’ without question, and now find myself questioning whether that was truly the ‘fix’ I thought it was.  (As you may recall, Mr. Charm was put on this elimination diet, too, so we could perhaps discover what other foods are troublesome for him.)

So I don’t think, at this point, that Mr. Happy is having any sort of FPIES reaction to my diet.  But I am wondering if he’s having what his brother has/had: some sort of other irritation to…something.

It’s a good thing I like the color grey, because I’m living in a grey area right now!

We will keep watching him.  I won’t feel comfortable adding any new foods to my diet until he has been at least 4 weeks nursing again, and preferably if these slight symptoms disappear.

I really hope his cheeks clear up and his diapers start looking good soon.  It’s taken 6+ weeks to get there, but I’m starting to have some food cravings.  Adding to my diet would be glorious right now!  (Spaghetti sounds SO. GOOD. I can hardly stand myself.)

Cradle Rocking Mama’s RULE

When Mr. Charm was diagnosed two years ago with a milk protein intolerance (MPI) and an IgE egg allergy, I thought about starting a blog.  The diagnosis was shocking, and really rocked our world…how do you LIVE without butter and cheese??  The doctors were really not much help; essentially, when you are given this diagnosis you are handed a printout of common ingredients that contain whatever allergen  you must avoid and told “Avoid these things and you’ll be fine.”

Humph.  Have you ever tried grocery shopping with an infant that nurses every 1.5 hours while reading every. single. ingredient. on every. single. item. in the grocery store while comparing it to a xeroxed sheet of unpronounceable words?  Have you ever tried to figure out how to substitute half the ingredients in your favorite recipes while trying to keep your baby entertained?  Yeah.  It’s hard.

That’s why I considered starting a blog then, and that’s why I did NOT start a blog then.  It was hard, and I really wanted to share what I was learning (my pediatrician actually told me I should write a book about it after I had, yet again, informed her of some fact about MPI that she didn’t know), but I was doing everything I could to tread water at that time.  The idea of taking on another project just made me feel tired.

So this summer, when Mr. Happy got HIS fun little diagnosis, I realized that my experiences with Mr. Charm had prepared me quite well for our new journey.  If I can figure out how to live, and live well, without cheese and butter, well…anything else is a piece of cake!  (Hi, I’m Mama, and I’m a cheese-a-holic. I’ve been mostly clean for two years.)

Somehow, even with two children, one of whom is energetic enough to single-handedly power Manhattan, and this new diagnosis that rocked the foundations of our world again, I knew I could handle sharing these experiences in a blog.  I’ve learned a lot about how to live in the confusing world of food allergies.  I knew this was the time to start sharing.  (Ahem.  I am by no means an expert!  I still learn something new almost every day!)

So I took the plunge and joined the ranks of “Mommy Bloggers”.  But then…a name…I had to have a blog name!

It’s almost as hard as naming your child, frankly.

I started coming up with allergy or FPIES related names, but decided against them.  Even though that would be a large focus of my posts, I knew I intended to also share some of the other things that interest me in the future, like craft projects, thoughts on parenting, and travel stories. Allergies are a huge part of my life, but they are, after all, only a part of it.  I didn’t want my blog to be self-limiting.

In the end, I decided that of all the things I am in this life, of all the things I want to write about, motherhood sort of sums it all up.  Yes, I’m a wife, and I will be a wife for longer than I will be a mother, and yes, I have a career, and I’ve had that career for a long time, but somehow being Mama to my boys has crystallized everything I know and everything I am.  It makes me evaluate my marriage not only to keep the Geek and I happy, but to ensure I’m setting the best possible example for my kids.  It makes me want to be a better employee in my job, so my boys see what hard work looks like.   Being a Mama has changed me, made me stronger, made me smarter (and more aware of the things I don’t know at the same time), and made me grow in ways I could never have imagined.

So I started thinking “Mom” names.  And what better ode to motherhood than this poem:

The Hand that Rocks the Cradle

Blessings on the hand of women!

Angels guard its strength and grace,

In the palace, cottage, hovel,

Oh, no matter where the place;

Would that never storms assailed it,

Rainbows ever gently curled;

For the hand that rocks the cradle

Is the hand that rules the world.


Infancy’s the tender fountain,

Power may with beauty flow,

Mother’s first to guide the streamlets,

From them souls unresting grow–

Grow on for the good or evil,

Sunshine streamed or evil hurled;

For the hand that rocks the cradle

Is the hand that rules the world.


Woman, how divine your mission

Here upon our natal sod!

Keep, oh, keep the young heart open

Always to the breath of God!

All true trophies of the ages

Are from mother-love impearled;

For the hand that rocks the cradle

Is the hand that rules the world.


Blessings on the hand of women!

Fathers, sons, and daughters cry,

And the sacred song is mingled

With the worship in the sky–

Mingles where no tempest darkens,

Rainbows evermore are hurled;

For the hand that rocks the cradle

Is the hand that rules the world.


William Ross Wallace (1819-1881)

Oh, yes!  We Mothers ARE the hand that rules the world.  We are the foundation of the home, the bedrock of our children’s upbringing.  We have an amazing, awesome responsibility and honor: to raise our children well, to protect them, to love them, to guide them into being responsible members of society and walking testimonies to faith.

(Have any doubts about the influence of mothers?  Think about all the people out there in therapy to undo what their bad mothers – and fathers – did to them!)

So that’s where it came from: I AM a Cradle Rocking Mama, and I rule my world.  Just like every other Mama rules hers.

(I’m feeling like a fist in the air and a “Power to the Mama’s!” shout right about now.)

Any other Cradle Rocking Mama’s out there?  Give a shout out about how you rule your  world!

Feel Like Being An Activist?

Once upon a time, I wasn’t a Mama.  I was a 15 year old, hormone-riddled freak of nature, just like all teenagers are.  And just like all kids, I went to school.

For the most part, I had a decent time in school.  The social labyrinth notwithstanding, I enjoyed learning new things.  Well, except for this one, little, irritating thing:  the school systems are rather stupid about many of their rules.  I guess anything government run can’t see the forest for the trees sometimes, but I found this new knowledge to be something I wished I’d never had to deal with.

For example, at my school they issued a rule that you had to wear a belt with your pants.  So despite the fact that I had been forced to lay down on my bed in order to zip my jeans one morning, I found myself in the prinicipal’s office waiting for my Dad to bring me a belt.

Stupid.

Or, if you had a headache, you could/would be expelled for popping your own aspirin in the hall.  You had to have a parents’ note, and leave the medicine in the nurses office, make the time – somehow – in the 5 minutes between each class to mosey on down there, and beg her for a pill.  You know, if she was in her office, and not off on her own little break at the time.

Stupid.

But stupidity is often the name of the game when dealing with public schools.  If you’re like me, you rolled your eyes at the ridiculous rules in place, and figured out a way to circumvent them when necessary.

That’s not always an option for kids with food allergies.  Schools are much more receptive to these children and their food issues nowadays, but one thing has not changed much: medicine rules.

Most states still require the children to leave their Epi-pen – complete with Doctor authorization – in the nurses office during school hours.

Think about that for a second.  Seriously.  A child with the potential to have a life-threatening reaction that can take only a few short minutes to prove fatal must leave their life-saving medicine in a nurses office some distance away, and so before this child can be treated with this life-saving medicine, someone must see the child react, recognize it for the anaphylaxis that it is, run to the nurses office, explain the situation, wait for her to get the Epi-pen, run back to the child, and then administer the shot once the nurse has verified the child needs it.

And let’s not forget that many children with mild food allergies can suddenly have a severe reaction out of the blue…often anaphylaxis reactions do not come with first exposure to a food.  So now little Jimmy or Janie is in the school, seriously reacting to a food, and even though there are Epi-pens in the nurses office, and she has been summoned to the sick child, she can do nothing but watch the child die in front of her…because it’s against the rules to administer an Epi-pen without a doctor’s note.

Um…we’ve progressed WAY beyond stupid now, right into the ballpark of reckless endangerment.

True, many children with severe food allergies can have a 504 plan documenting that they will carry their Epi-pen with them, but many states do not allow the Epi-pen out of the nurses office even with a 504 plan.

Let’s fix this stupid rule, shall we?  The School Access to Emergency Epinephrine Act (S. 1884/HR. 3627) will allow states to require schools to maintain an easily accessible supply of epinephrine and allow them to administer it to any child believed to be having an anaphylactic reaction.

This means, no more Epi-pens in the nurses office only.  They will be located throughout the school and NOT under lock and key, which could well make the difference between life and death.  

This is important stuff, here!  I mostly write about my kids non-IgE mediated allergies on here, but I never forget that they both have serious IgE allergies that require the use of an Epi-pen in addition to their other FPIES style allergies.  One day they may be in public schools, and I would feel much more comfortable with that situation if I knew that they could carry their Epi-pens with them, and that there were backup Epi-pens available and accessible should it be necessary.

Aside from my own kiddos, something like 8% of children in public schools have at least one food allergy.  Those are just the kids who have been diagnosed and have reported it to the school district; the actual number could be higher.  So there are lots of little munchkins running around that will benefit greatly from this legislation.

So take a moment to be an activist today!  The bill is in committee, and they’ve yet to make their report.  There is still time to make your voice heard.  Write your Congressmen and Senators and tell them you support this legislation.  Tell them to vote YES for this act.  Tell them to be decent human beings and save children’s lives.  

Consider it your good deed for the day.  Thank you for being so nice.  And for kicking stupidity in the butt.

(I’ve read and heard about this act before, but my reference for this post came from an article in Living Without magazine.)


The Guilt Trip Cometh

There is, apparently, no end to the sacrifices I will make for my children.

I say this because I have eschewed any and all medications for the duration of this elimination diet, out of fear that something in those medications will cause problems for Mr. Happy.

Did I mention that I have an old whiplash injury and an old sprained back injury that occasionally pop up with a vengeance, causing headaches, stiff  everything and serious pain?

Taking Advil every 4 hours basically keeps the pain, stiffness, and headaches at bay so I can use stretching and hot/cold therapy to alleviate the cause without suffering too badly for the few days it lasts.

Right now, though, everything from the top of my head to my lower back is aching and hurting, and I am taking nothing.  The stretching and hot/cold therapy will eventually work, but I’m suffering through the time it takes to ease the muscle/ligament kink ups.

But have you read the ingredient list on a bottle of Advil lately?

Scary stuff, I tell you.  Can anyone even pronounce those words?

So, I’ll suffer through it.  The pain is just temporary anyway.

My kids better LOVE me for this, though.  (I sense a guilt trip coming in ten or fifteen years…don’t you?)

Anyone have any brilliant ideas on how to deal with muscle and ligament pain without drugs?

Quinoa Pasta Noodles

Spaghetti has always been a big hit in our household.  Thanks to my Dad, I make a knock-your-socks-off spaghetti sauce.  The Geek lived in Italy for a few years, and he says my sauce is as good, if not better, than most of the sauces he ate while he was there.

Yes, my chest puffs out a little when I get compliments like that.

So spaghetti was one of the few things we truly lamented giving up on this elimination diet. Semolina flour noodles are not approved (yet), and what good is pasta sauce with no noodles?

We added quinoa to the Geek and Mr. Charm’s diet about ten days ago.  So far, so good! They both like it, and Mr. Charm doesn’t seem to show any adverse affects.

So I got to thinking…there has to be a way to make quinoa pasta noodles – after all, it comes in flour form.  Surely there’s a recipe out there to turn that healthy, yummy flour into something resembling a noodle, right?

Well.  It’s not so simple!  Pretty much every recipe I found called for eggs (major allergy no-no) or the addition of another flour (not yet approved on our diet).  I started thinking I was just going to have to wing it completely, when I found this recipe on the blog Just Eat Love and realized I had discovered a terrific base recipe to tweak!  (I’ve never actually read her blog before searching for quinoa noodles on google, but she has some beautiful recipes, if you’d care to look!)

Please go look at her original recipe; I’m sure it is absolutely delicious!  But here, I’m going to share with you how I tweaked it to fit in our elimination diet and how delicious my tweaks turned out!

Here’s what I did:

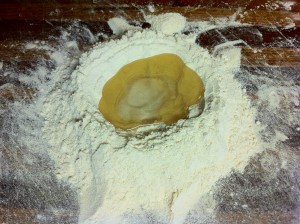
Take 1 1/2 cups of quinoa flour, mix it with 1/2 cup of potato starch and 1/2 tsp. of salt.  Lay it out on your (clean) counter and make a well in the center.  Into the well, put 1 T of olive oil and 2 T of warm water.

It’s a volcano!

Start working the liquid into the flour from the outside in.  Here’s where my inexperience showed; I’ve never made pasta before, so my mixing was clumsy at best!  The original recipe said to add water a T at a time until the dough was the right consistency – stiff, firm, not sticky, not too dry.  I accidentally added one T too many and had to start adding flour back in to get it right!  So in the end, my measurements were not quite what I started with.

The important thing, though, is to get the dough to the right consistency, even if you have to tweak like I did.

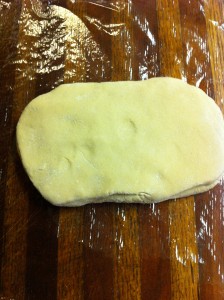
Eventually, the dough will come together and “feel” right.  When it does, roll it into a ball and knead it for about 5-10 minutes.  Once you’re done groping the dough, flatten it into a disc shape and wrap it in saran wrap.

It looks a lot like play dough, actually.

Set the dough aside for 30 minutes to an hour.  This would be a good time to whip up the sauce!

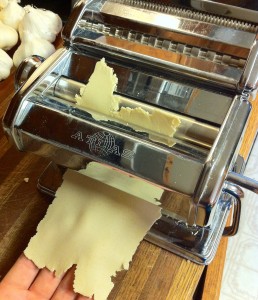
Take the dough out of the saran wrap and break into two pieces, recovering the unused portion with wrap until you’re ready for it.  If you have a pasta maker, haul it out of storage and put it to use now.

Roll the dough into thin sheets; if using a pasta maker, start at setting 1 and work up from there.  I found that the dough started to fall apart if I got to setting 6, so I started over and worked it up to setting 5, which worked great for my purposes.  If you have a toddler around, they’re ever so thrilled if you let them turn the handle for you!

If doing it by hand, just keep rolling that puppy out until it’s thin enough to make you happy.

Mr. Charm had fun turning the handle for me.

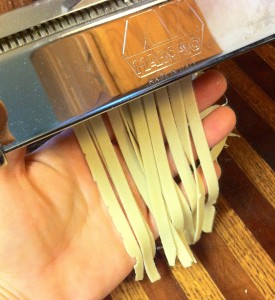
I had a pasta maker, so the next step was kind of fun.  I took the thin sheets of pasta and put them through the cutter attachment.

Easy Peasy!

If you’re doing this by hand, you can take the thin sheets of pasta, dust them with flour, and roll them lightly into a tube shape.  Then it will be easy to cut long strings of pasta with a sharp knife!

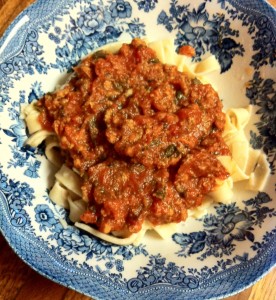
Put some water on to boil and add a little salt.  When it’s boiling, toss in the noodles.  In a short 3-4 minutes, they’re cooked and ready to serve!

Yummy!

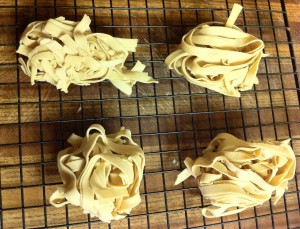
This batch made just a tad too much for both the Geek and Mr. Charm to eat, so I took the remaining noodles and ‘puddled’ them to dry.  Like I said, I’m new to this, and I managed to get the noodles stuck together enough that I couldn’t lay them flat to dry.  So, I thought I’d try to ‘fake’ a gourmet look and here’s what I got:

Hey, it worked!

If you’re more talented than I am at noodles, then try to lay them flat to dry.  I’m sure it would be easier to store.

Since these are fresh with no preservatives, I would store them in the refrigerator for longer storage times.  They’d probably be okay on the counter for a few days or a week (?), but I’m guessing.

Of course, the true test of any food is: how does it reheat?  Leftovers are important!  So the next day I made the Geek eat leftover, reheated spaghetti and noodles, and he said they tasted just as good as the first day!  I also cooked up the dried noodles and served him those, and they also passed muster.

So if you’re looking for a small ingredient pasta noodle recipe, I can confidently say that your search is over!

The next trial for me?  Adding pureed spinach to make spinach quinoa noodles!  Talk about nutritious!

__________

QUINOA PASTA NOODLES

-1  1/2 c quinoa flour
– 1/2 c. potato starch (or other starch safe in your diet)
– 1/2 tsp. salt
– 1 T Olive oil (or other safe oil – this could possibly be omitted)
– up to 1/2 c warm water

  1. Mix flour, starch and salt; place on counter.
  2. Make well in your flour, into it add olive oil and 1-2 T of water.
  3. Begin mixing your dough from the outside in; the consistency you’re looking for is pliable, not too dry and not sticky.  Add water (and/or flour!) until the right consistency is reached.
  4. Knead the dough for 5-10 minutes.
  5. Flatten dough into a disc shape, cover in saran wrap and let rest for 30 minutes to an hour.
  6. Break the dough into two halves.  Working with the first half, roll dough out as thin as you like it using either a pasta maker or a rolling pin. Repeat with second half.
  7. Cut into whatever shape you like.  At this point you can dry the noodles, or store in the refrigerator for later.
  8. Add noodles to salted, boiling water; cook for 3-4 minutes.
  9. Serve with your favorite pasta sauce and enjoy!

__________

Do you have any fabulous elimination diet/allergy friendly tweaks to recipes?  

This post shared with Gluten Free Fridays.

Bumps and Bruises and…Bureaucrats?

Despite, or perhaps because of, my children’s allergies and food issues, I want them to have as normal and independent a childhood as possible.  After Mr. Charm was born, I was turning into a helicopter Mom of the worst kind; his health concerns kept me hovering over him constantly, and it was getting to be worrisome for me (and the Geek!)

I stumbled onto Free Range Kids one day, and subscribed to her blog.  I don’t always agree with everything she says (does anyone always agree with other people?) but her point of view helps keep me from taking away too much of my children’s independence by doing too much for them.

Because of her, I let my kids play.  Mr. Charm is a climber, and I let him climb (within reason).  He’s a rough-and-tumble little boy, and I let him be who he is.  That means he falls, trips, bumps into things, and gets into sticky situations sometimes.

That’s normal, in case you’ve forgotten!  I sometimes have to think back to my own childhood to really let go.  Think about all the messes you got into as a kid, and how they helped shape who you became!  Far be it from me to steal that sense of self-reliance from my own kids.

But this post got me thinking…will parents like me who let their kids be kids get called to the mat for it?

I spend a lot of time with doctors and in hospitals now.  Will some well-meaning nurse or doctor take a look at the bruises and boo-boo’s Mr. Charm and, eventually, Mr. Happy have and report me to the authorities?

There is a huge difference between normal childhood boo-boo’s and a child suffering from neglect.  Can we really trust a bureaucrat to make that distinction?

It’s hard being a parent.  It’s harder when you don’t follow the crowd and take childhood away from your kids.

Do you worry more about what your child is doing, or what other people might do about what your child is doing?  

Lollipop, Lollipop, oh Lolli-lolli-lolli-lollipop!

How’d you like to soothe your child’s throat (or your own) with a homemade, old-fashioned remedy that masquerades as a sweet treat?

It also works well as a bribe.  Not that I would ever bribe my children!  (cough cough)

Well, thanks to Mr. Charm’s dairy and egg allergies, I started down a path that I never would have imagined this pizza loving queen would travel: the world of Real Food.  Who needs high fructose anything?  What’s up with all the chemicals in our foods?  Ugh!  So, we eventually cut out all sodas, most refined sugar, and almost anything that came out of a package over the last two years.

I felt righteous about how healthily I was feeding my family.  I felt crappy about how my children were going to be deprived of some of the treats I adored as a child.  (Starbursts, anyone?)

So a while back, I stumbled on a really awesome recipe and bookmarked it to try for Mr. Charm.  Then, of course, the summer came with a new baby and some serious stresses, and I never did make the time.

This week, Mr. Charm got a little cold.  A little runny nose, some congestion, and a scratchy throat.  It seemed the ideal time to give this brilliant idea a try!

What is this awesomeness, you may ask?

Homemade Honey Lollipops.

I know, right?  Who doesn’t love honey?  And it’s GOOD for you!  Someone says I can turn it into a goodie for my kids?  Sign me up!

So basically, I followed the Farmlife Chick’s recipe to the letter, so please go visit her website to read all her amazing instructions.  (Frankly, go read her website even if you don’t want to make this treat – I’ve found at least 4 other recipes I can’t wait to try!  She’s amazing!)

The gist of it is this:

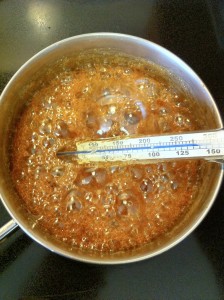
Take 1/2 cup of honey (does it need mentioning that the ‘real thing’ straight from a honeybee is the best to use?) and put it in a heavy saucepan.  Turn the fire up to somewhere between low and medium.

Get the honey boiling, and use a candy thermometer to monitor the temperature.  It needs to get to 300 degrees.

I may have boiled it a little too high and fast…but it worked!

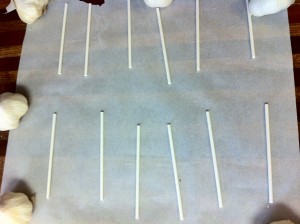
While it’s getting warmed up, lay out a silpat or parchment paper and lay your lollipop sticks out with some space between them.

Yes, I know – that IS garlic I’m using to hold the paper flat!  Improvise!

Lollipops just waiting to happen…

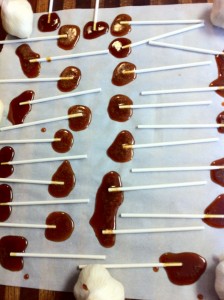
Once the honey is hot enough, start pouring it onto your sticks!

This is a new technique for me.  I’ve never made candies before, and pouring was a little…uneven, on my part.  The original poster made such beautiful lollipops, you would have thought they were store bought!  Mine could never be mistaken for anything but homemade.

Sort of reminds me of amoeba’s, don’t you think?

A few of them ran together, and I only had a few come out nicely rounded; most had a lopsided shape to them.  Oh well!  It’s my first time trying it, and they taste amazing (so says the men in my household – honey isn’t on my diet yet).  So I’m not concerned about the shape.  I don’t think my two year old is, either!

Wait for them to cool down and then peel them right off the parchment paper and serve to your drooling toddler as he bounces next to you in the kitchen.

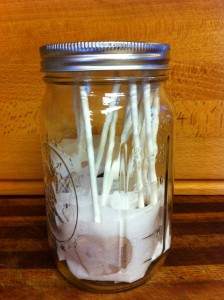
When you’re ready to store them, you can get some little treat bags and wrap them all up nicely, or do what I did, which was to use the original parchment paper, cut into strips, lay the pops down in a row and roll them up so they don’t touch each other and stick together.  Then shove the whole mess into a Mason jar and screw the lid on.

They make the counter look so nice and festive!

If we gave him the chance, Mr. Charm would eat this whole jar in about two days.

For the record, I wound up with 25 lollipops from this 1/2 cup of honey.  I was scrambling to add more sticks to the paper as I was pouring!  So you may want to use a larger piece of parchment paper than you think you’ll need, just in case.  This *may* have a little to do with why some of my suckers ran together.

This time, I made them just basic honey.  Next time, I’ll add a little lemon juice to them for an extra healing kick.  Wonder if some pureed garlic would taste okay?  That would be an old wive’s tale trifecta of natural home healing!

Enjoy your candy making!

__________

HOMEMADE HONEY LOLLIPOPS

– 1/2 cup honey
– lollipop sticks
– parchment paper or silpat
– candy thermometer

  1. Pour 1/2 cup of honey into a heavy saucepan.
  2. Heat to 300 degrees over low-medium heat.
  3. Lay out your lollipop sticks on the parchment paper or silpat.
  4. Pour the heated honey on the end of the lollipop sticks.
  5. Let cool, and enjoy a sweet treat that heals!

__________

Do you have any Real Food, yummy candies that you’ve found your kids love?  Please share!